2020. 9. 17. 00:56ㆍWeb Server/CentOS 7
1. 개요
웹사이트에 HTTPS 프로토콜을 사용하기 위해서는 CA(Certificate Authority, 인증기관)로부터 발급받은 SSL/TLS인증서가 설정되어있어야 합니다.
이전 포스팅에서 우리는 공인 SSL CA기본으로부터 SSL/TLS 인증서를 발급받고 Apache 웹서버에 인증서를 설정하는 방법을 배웠습니다.
RapidSSL이나 GlobalSign와 같은 CA는 유료 서비스로 일년에 1만원에서 크게는 35만원을 지불해야합니다.
개인정보 위변조에 매우 민감한 비즈니스나 금전 관련 웹서비스를 제공하고자 한다면 이러한 유료 CA로부터 SSL/TLS 인증서를 발급받는 것이 좋으나, Spring Boot demo 프로젝트와 같은 개인 웹사이트의 경우에는 굳이 유로 SSL/TLS 인증서를 설정할 필요가 없습니다.
그럼, demo 웹페이지에 무료 SSL/TLS 인증서를 설정해보도록 합시다.
2. Let's Encrypt?

Let's Encrypt는 무료 SSL/TLS인증서를 발급해주는 CA 기관으로 Mozilla Foundation, Google Chrome, Cisco System 와 같은 글로벌 기업으로부터 스폰서를 받고 있는 서비스 입니다.
하나의 인증서에 여러개의 도메인을 설정하는 것과 와일드카드 도메인을 설정하는 것을 지원합니다.
인증서를 발급받기 위해 나라이름, 주이름, 구이름, 기관명, 조직명, 이메일주소를 입력받던 유료 CA 기관과 달리 Let's Encrypt CA는 이메일 값만 입력받습니다.
인증서 유효기간은 90일 이며, 만료된 인증서에 대한 자동 갱신을 지원합니다.
단, 인증서로 인해 발생된 피해는 보상해주지 않습니다.(배상금은 없습니다.)
3. Certbot 설치

Let’s Encrypt는 ACME 프로토콜을 사용하여 설정한 도메인명의 유효성을 확인하고 인증서를 발급합니다.
따라서, Let’s Encrypt CA로부터 SSL/TLS 인증서를 발급 받고 싶다면 ACME 클라이언트 소프트웨어를 하나 설치해야 합니다.
Let’s Encrypt에서는 그 중 사용하기 편리하고 다양한 OS에서 작동되는 Certbot 을 사용하는 것을 권장하고 있습니다.
3-1) epel-release 설치
certbot은 CentOS7의 공식 저장소에 포함되어있지 않은 Extras 패키지입니다.
따라서 Extras 저장소인 EPEL을 사전에 설치하여 EPEL Repository를 활성화 해야합니다.
yum repolist
yum repolist 명령어를 이용하여 현재 서버에서 이용하고 있는 yum 저장소 목록을 조회합니다.
만약 EPEL 저장소가 없다면 epel-release를 설치합니다.
sudo yum install epel-release
yum repolist | grep epel
 * epel: nrt.edge.kernel.org
 * epel-debuginfo: nrt.edge.kernel.org
 * epel-source: nrt.edge.kernel.org
!epel/x86_64                       Extra Packages for Enterprise Linux 7  13,446
!epel-debuginfo/x86_64             Extra Packages for Enterprise Linux 7   2,677
!epel-source/x86_64                Extra Packages for Enterprise Linux 7       0
3-2) certbot 설치
certbot과 certbot Apache 웹서버 플러그인을 설치합니다.
sudo yum install certbot python2-certbot-apache
만일 Apache 웹서버가아닌 Nginx 웹서버에 SSL/TLS 인증서를 설치할 것이라면 python2-certbot-nginx를 설치하면 됩니다.
4. Certbot을 이용하여 인증서 발급받기
certbot 설치를 완료하였으니 이제 이 명령어를 이용하여 인증서를 발급받아봅시다.
sudo certbot --manual --preferred-challenges dns -d *.jiniworld.me,jiniworld.me certonly
- --manual
- 쉘스크립트상에서 직접 인증관련 설정(이메일)및 기타 옵션을 설정합니다.
- --preferred-challenges dns
- DNS TXT를 이용하여 인증서를 인증합니다.
- -d 도메인명
- 인증서에 설정할 도메인을 설정합니다.
- 도메인은 FQDN을 작성해야합니다. (
www.jiniworld.me와jiniworld.me는 서로 다른 도메인입니다.) - 여러개를 설정하고 싶다면
,로 구분지어 설정할 수 있습니다. *를 이용하여 Wildcard를 포함한 도메인도 설정할 수 있습니다.
- certonly
- certbot이 웹서버 구성파일을 직접 수정하지 못하도록 설정합니다.
위에서 --manual 옵션을 설정했기 때문에 쉘스크립트 상으로 이메일 및 기타 옵션 정보를 설정하게됩니다.
Saving debug log to /var/log/letsencrypt/letsencrypt.log
Plugins selected: Authenticator manual, Installer None
Enter email address (used for urgent renewal and security notices)
 (Enter 'c' to cancel): jini@jiniworld.me
인증서 관리자의 이메일을 입력합니다.
Starting new HTTPS connection (1): acme-v02.api.letsencrypt.org

- - - - - - - - - - - - - - - - - - - - - - - - - - - - - - - - - - - - - - - -
Please read the Terms of Service at
https://letsencrypt.org/documents/LE-SA-v1.2-November-15-2017.pdf. You must
agree in order to register with the ACME server at
https://acme-v02.api.letsencrypt.org/directory
- - - - - - - - - - - - - - - - - - - - - - - - - - - - - - - - - - - - - - - -
(A)gree/(C)ancel: A
이용약관을 동의(A)합니다.
- - - - - - - - - - - - - - - - - - - - - - - - - - - - - - - - - - - - - - - -
Would you be willing, once your first certificate is successfully issued, to
share your email address with the Electronic Frontier Foundation, a founding
partner of the Let′s Encrypt project and the non-profit organization that
develops Certbot? We′d like to send you email about our work encrypting the web,
EFF news, campaigns, and ways to support digital freedom.
- - - - - - - - - - - - - - - - - - - - - - - - - - - - - - - - - - - - - - - -
(Y)es/(N)o: Y
이메일 정보를 Electronic Frontier Foundation 기관에 공유할지 여부를 선택합니다. 공유하고자한다면 Y, 공유를 원하지 않는다면 N
- - - - - - - - - - - - - - - - - - - - - - - - - - - - - - - - - - - - - - - -
NOTE: The IP of this machine will be publicly logged as having requested this
certificate. If you′re running certbot in manual mode on a machine that is not
your server, please ensure you′re okay with that.

Are you OK with your IP being logged?
- - - - - - - - - - - - - - - - - - - - - - - - - - - - - - - - - - - - - - - -
(Y)es/(N)o: Y
IP 로깅 여부를 설정합니다.
- - - - - - - - - - - - - - - - - - - - - - - - - - - - - - - - - - - - - - - -
Please deploy a DNS TXT record under the name
_acme-challenge.jiniworld.me with the following value:

ZWvs9sQTUKrptbwZuto4Yr6ZKv4QyaOnr2ryFXzh61A

Before continuing, verify the record is deployed.
- - - - - - - - - - - - - - - - - - - - - - - - - - - - - - - - - - - - - - - -
Press Enter to Continue
도메인 유효성 검사를 위한 DNS TXT 레코드 값이 출력되었습니다.
엔터키를 누르기 전에 DNS 서버에 위의 값을 추가합니다.
※ DNS TXT를 이용하여 인증서를 인증할 경우, 해당 도메인에 대한 DNS A/AAAA record도 등록되어있어야 합니다.

DNS 서버에 레코드를 추가했다면 이제 엔터키를 누릅니다.
nslookup 명령어를 이용하여 등록한 DNS 레코드를 조회해볼 수 있습니다.
nslookup -q=TXT _acme-challenge.jiniworld.meAddress: 157.7.180.133#53 Non-authoritative answer: _acme-challenge.jiniworld.me text = "fWRAgF3vz3TKzf6_dEVB3lgao6D6BergKKN-6Q7tr1s" Authoritative answers can be found from:
Waiting for verification...
Resetting dropped connection: acme-v02.api.letsencrypt.org
Cleaning up challenges
Subscribe to the EFF mailing list (email: jini@jiniworld.me).
Starting new HTTPS connection (1): supporters.eff.org

IMPORTANT NOTES:
 - Congratulations! Your certificate and chain have been saved at:
   /etc/letsencrypt/live/jiniworld.me/fullchain.pem
   Your key file has been saved at:
   /etc/letsencrypt/live/jiniworld.me/privkey.pem
   Your cert will expire on 2020-12-13. To obtain a new or tweaked
   version of this certificate in the future, simply run certbot
   again. To non-interactively renew *all* of your certificates, run
   "certbot renew"
 - Your account credentials have been saved in your Certbot
   configuration directory at /etc/letsencrypt. You should make a
   secure backup of this folder now. This configuration directory will
   also contain certificates and private keys obtained by Certbot so
   making regular backups of this folder is ideal.
 - If you like Certbot, please consider supporting our work by:

   Donating to ISRG / Let′s Encrypt:   https://letsencrypt.org/donate
   Donating to EFF:                    https://eff.org/donate-le
이제 인증서 발급이 완료되었습니다.
/etc/letsencrypt/live/jiniworld.me경로에 들어가면 private key 및 SSL/TLS 인증서들이 있을것입니다.
5. Apache 웹서버에 인증서 설정하기
생성된 인증서를 Apache 웹서버의 가상호스트에 설정해봅시다.
/etc/letsencrypt/live/jiniworld.me
위의 디렉토리로 이동하면 방금 전에 생성한 SSL/TLS 인증서 및 private key가 있습니다.
-rw-r--r-- 1 root root 692  9월 14 22:32 README
lrwxrwxrwx 1 root root  36  9월 14 22:32 cert.pem -> ../../archive/jiniworld.me/cert1.pem
lrwxrwxrwx 1 root root  37  9월 14 22:32 chain.pem -> ../../archive/jiniworld.me/chain1.pem
lrwxrwxrwx 1 root root  41  9월 14 22:32 fullchain.pem -> ../../archive/jiniworld.me/fullchain1.pem
lrwxrwxrwx 1 root root  39  9월 14 22:32 privkey.pem -> ../../archive/jiniworld.me/privkey1.pem
이 인증서와 키를 가상호스트에 설정해봅시다.
<VirtualHost *:443>
  ServerName demo.jiniworld.me
  CustomLog "/var/log/httpd/demo/access_log" common
  ErrorLog "/var/log/httpd/demo/error_log"

  SSLEngine on
  SSLProxyEngine on
  SSLProtocol all -SSLv3

  SSLCertificateKeyFile /etc/letsencrypt/live/jiniworld.me/privkey.pem
  SSLCertificateFile /etc/letsencrypt/live/jiniworld.me/cert.pem
  SSLCACertificateFile /etc/letsencrypt/live/jiniworld.me/fullchain.pem

  RequestHeader set X-Forwarded-Proto "https"
  RequestHeader set X-Forwarded-Port "443"

  ProxyPreserveHost on
  ProxyPass / http://127.0.0.1:8989/ nocanon
  ProxyPassReverse / http://127.0.0.1:8989/
  ProxyRequests off
  AllowEncodedSlashes NoDecode

  <Proxy http://127.0.0.1:8989/*>
     Order deny,allow
     Allow from all
  </Proxy>
</VirtualHost>
Apache 2.4 웹서버에 VirtualHost(가상호스트)를 설정하는 방법이나 VirtualHost에 SSL/TLS 인증서를 설정하는 방법, 각 요소들에 대한 옵션에 대해 더 상세히 알고 싶다면 이전 포스팅을 참고해주세요.
[Apache 2.4] VirtualHost(가상호스트) 설정하기
[Apache 2.4] VirtualHost에 SSL/TLS 인증서 설정하기
6. 인증서가 적용된 demo 웹페이지
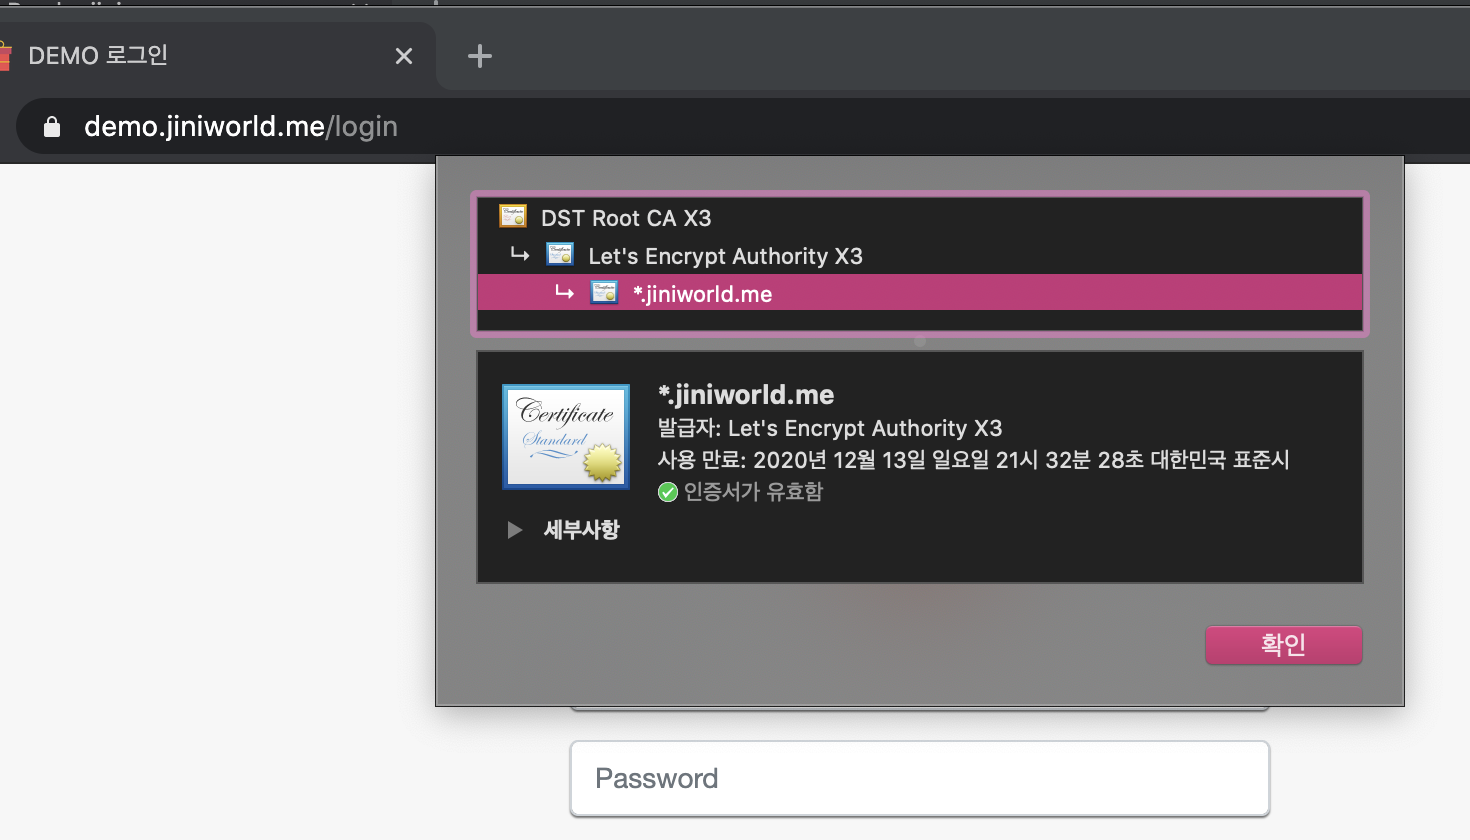
Let's Encrypt CA로 부터 발급받은 SSL/TLS 인증서가 잘 적용되어있습니다.
++ tip
물론, 인증서를 이용하기 위해서는 사전에 DNS 설정이나,

클라우드 서버 내의 443 포트에 대한 방화벽 설정이나

CentOS 7 서버 내에 방화벽 기능이 활성화 되어있을 경우, https 서비스 또는 포트가 활성화되어있는지를 확인해야합니다.
sudo firewall-cmd --list-all
apple (active)
  target: default
  icmp-block-inversion: no
  interfaces: eth0
  sources:
  services: dhcpv6-client http https mysql
  ports: 8443/tcp 60000-61000/udp
  protocols:
  masquerade: no
  forward-ports:
  source-ports:
  icmp-blocks:
  rich rules:
++
- Let's Encrypt CA의 무료 SSL/TLS 인증서 발급 및 적용하기
- Apache 2.4에 무료 SSL 인증서 설정하기
- 무료 SSL/TLS 인증서 발급받기
- certbot을 이용하여 무료 SSL인증서 발급받기
'Web Server > CentOS 7' 카테고리의 다른 글
| [CentOS 7] Let's Encrypt CA의 무료 SSL 인증서 발급 및 자동갱신하기 (1) | 2021.08.27 |
|---|---|
| [CentOS 7] Apache 2.4.48 웹서버 수동 설치 및 TLS 1.3 적용하기 (6) | 2021.06.21 |
| [CentOS 7] Apache 웹서버의 VirtualHost에 SSL 인증서 설정하기 (0) | 2020.08.31 |
| [CentOS 7] Apache 2.4 웹서버에 VirtualHost(가상호스트) 설정하기 (0) | 2019.07.30 |